Potentiometer Model
CIRCUIT
POT1.CIR Download the SPICE file
The uses of a potentiometer are many - trim the gain of an amplifier to a precise value, subtract a large offset from a sensor, or adjust the tone control in an audio system. Simulating a potentiometer in SPICE is easy. We'll just extend the model of a Voltage-Controlled Resistor.
THREE LEGS
The potentiometer is a three legged animal having a fixed resistance between its outer legs. The middle leg functions like a wiper you can slide along its length. The wiper essentially splits the fixed resistor R1 in two resistors, R1A and R1B.
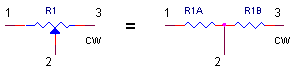
As the wiper slides toward the CW end, R1A gets bigger as R1B gets smaller. These simple equations tell the tale of two resistances.
R1A = WP ∙ R1
R1B = ( 1 - WP ) ∙ R1
The WP (Wiper Position) ranges from 0 to 1 corresponding to the fully CCW (Counter Clock-Wise) and fully CW (Clock-Wise) positions. For example, for a 1 kΩ pot with the wiper adjusted 1/4 turn from the CCW end (WP = 0.25), you have R1A = 0.25 kΩ and R1B = 0.75 kΩ. Keep in mind, the sum of the two resistors should equal the fixed end-to-end value, R1A + R1B = R1.
SPICE MODEL
To model the potentiometer in SPICE, split the device into two resistors, just like above. Then simulate each resistor with a voltage-controlled resistor. For convenience, place the model into a subcircuit.
* POTENTIOMETER SUBCIRCUIT
*
* TERMINALS: 1-CCW , 2-WIPER, 3-CW
* WIPER POSITION VOLTAGE: 7-POS,8-NEG
*
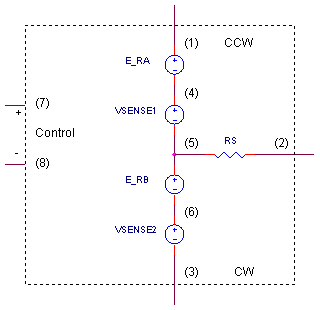
.SUBCKT POT_1K 1 2 3 7 8
E_RA 1 4 VALUE = { V(7,8) * 1K * I(VSENSE1) }
VSENSE1 4 5 DC 0V
RS 5 2 1
E_RB 5 6 VALUE = { (1-V(7,8)) * 1K * I(VSENSE2) }
VSENSE2 6 3 DC 0V
.ENDS
E_RA and V_RB mimic resistors by producing voltages proportional to their current. (See Voltage-Controlled Resistor.) The voltage at nodes 7 and 8 represent the wiper position, WP. Also notice, we've slipped in a small resistance RS in series with the wiper leg. Although it has a negligible effect on the overall resistance, it avoids a troublesome voltage loop (the SPICE algorithm halts) if you ever connect the pot's wiper to one of its own outer legs.
VOLTAGE OFFSET TRIM
The need may arise to generate an adjustable voltage. Why? This may be used to subtract away an unwanted (and unknown) offset of a sensor or amplifier. How do you create an adjustable offset? Just take a voltage divider and replace one of the resistors with a potentiometer.
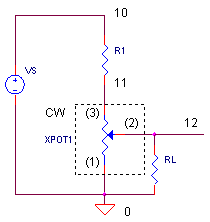
CIRCUIT INSIGHT Run the SPICE file POT1.CIR. The ramp voltage at VPOS simulates the wiper position adjusted from its CCW to CW positions. Plot the voltage at the wiper V(12). It should ramp from 0V to its maximum set by voltage divider R1 and XPOT1. Plan to give yourself more voltage range than you need. This avoids too little range when the actual values R1 and XPOT1 vary due to their component tolerances.
Pick a new value for R1 or change the pot's resistance value in the E_RA and E_RB definitions. What does your new adjustment range look like? RL represents the loading of the next stage. It will have a greater impact as its resistance gets smaller. You need to account for its effect on the overall voltage range.
RESISTOR VALUE TRIM
Suppose your precision amplifier requires an adjustable resistor to achieve an overall accuracy better than 0.1%. Connecting the pot's wiper to one of its legs creates a two terminal adjustable resistor. Team this up with a regular resistor, and you've created a device that's adjustable over a smaller range.
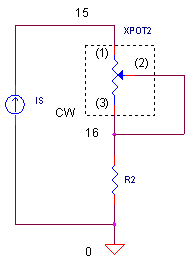
For example, by placing a 19.5 kΩ resistor in series with a 1 kΩ pot, you've got a combined resistance that's adjustable from 19.5 to 20.5 kΩ.
CIRCUIT INSIGHT To measure resistance, we'll use the old trick of injecting a 1A source into the component. The voltage across this component really represents the resistance V = I x R = 1 x R = R. Take the circuit out for a spin and plot the "resistance" at V(15). What is its adjustment range? Change R2 or get into the subcircuit and change the 1K value in both E_RA and E_RB sources. What does the new range look like?
SIMULATION NOTES
For a quick review, check out the Subcircuits or Voltage-Controlled Resistor topics.
SPICE FILE
Download the file or copy this netlist into a text file with the *.cir extension.
POT1.CIR - POTENTIOMETER MODEL
*
* WIPER POSITION: 0V=CCW, 1V=CW
VPOS	20	0	PWL(0MS 0V   100MS 1V)
RPOS	20	0	1MEG
*
* OFFSET VOLTAGE TRIM
VS	10	0	10V
R1	10	11	9.5K
XPOT1	0 12 11	20 0	POT_1K
RL	12	0	100K
*
* RESISTANCE VALUE TRIM
IS	0	15	1A
XPOT2	15 16	16 20 0 POT_1K
R2	16	0	19.5K
*
*
* POTENTIOMETER SUBCIRCUIT
*
* TERMINALS:	1-CCW , 2-WIPER, 3-CW
* WIPER POSITION VOLTAGE:	7-POS,8-NEG
*
.SUBCKT POT_1K   1 2 3  7 8
E_RA	1	4	VALUE = { V(7,8) * 1K * I(VSENSE1) }
VSENSE1	4	5	DC	0V
RS	5	2	1
E_RB	5	6	VALUE = { (1-V(7,8)) * 1K * I(VSENSE2) }
VSENSE2	6	3	DC	0V
.ENDS
*
*
* ANALYSIS
.TRAN 	0.1MS  100MS
* VIEW RESULTS
.PRINT	TRAN 	V(12)
.PROBE
.END
© 2003 eCircuit Center