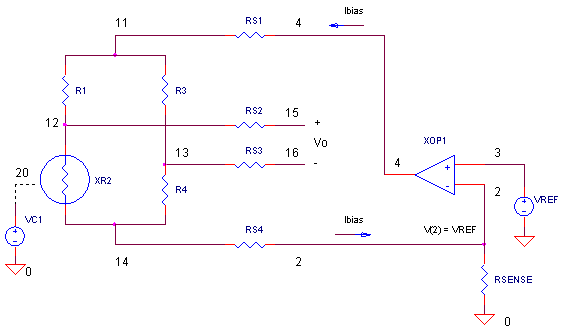
SENSOR BRIDGE with CURRENT BIAS
CIRCUIT
SBRIDGE_I_BIAS1.CIR Download the SPICE file
When biasing a sensor bridge, you've got two choices - voltage or current. A voltage reference driving the bridge typically provides you with a useful sensor signal. But some applications require that the sensor bridge be located great distances from the amplifier. What are the dangers? The resistance of the long wires to the sensor bridge can drop a significant amount of voltage bias, reducing the sensor's output. To make matters worse, a noisy environment can inject voltage variations across the bridge, directly modulating the sensor's signal. What to do?
The other choice is to drive the bridge with a constant current source. As we'll see, a simple op amp current-source does the trick of reducing the problems of remote sensing. If you need enhanced performance, you'll see how to include a transistor current buffer into the loop. Also, current sources are not just for remote sensing. Some sensors (like RTD's) are recommended to be driven from a current source.
CURRENT SERVO
The objective of the circuit is simple- provide a constant current that flows in and out of the bridge, regardless of the resistances in any of the 4 legs. The op amp circuit above does a nice job of servoing the current through the bridge to a constant level. Let's look at some key components. As the resistor name implies, RSENSE senses the current by developing a voltage proportional to Ibias. Next, the op amp has its positive input connected to VREF. Finally we look at the mission of the op amp
Op Amp Mission Statement - Adjust the output to make the negative input equal to the positive input.
Notice the op amps' negative input connected to the voltage across RSENSE! So essentially, the op amp servos its output until the voltage across RSENSE is equal to VREF, regardless of the bridge resistances. Achieving this mission results in a bridge current of
Ibias = VREF / RSENSE
So what does the accuracy of the current depend on? As the equation shows, tight tolerances (or manual adjustments) are required for VREF and RSENSE. Suppose you needed a bias current of 10 mA and had a 1 V reference available, what value of RSENSE is needed?
RSENSE = VREF / Ibias
= 1.0 V / 10 mA
= 100 Ω
SENSOR BRIDGE
The sensor bridge is made up of fixed resistors (R1, R3, R4 = 1 kΩ) and a Voltage Controlled Resistor (XR2 = 1 kΩ nominal) representing the sensor. XR2 is a subcircuit who's resistance is scaled by the voltage at VC1. Ramping VC1 from 0.9 to 1.1 V directly scales XR2's nominal resistance of 1000 Ω from 900 to 1100 Ω. This simulates a sensor's resistance change in response to a change in some physical phenomenon (temperature, strain, etc.)
Four additional resistors RS1 - RS4 represent the resistance of the long wires that connect the remotely located bridge to the local circuitry. The bridge's output Vo would be fed to an instrumentation amplifier's input.
For a ±10% change in sensor resistance (ΔR = ±100 Ω), what is the expected voltage change at the bridge output? For a current driven bridge where one element varies, the output voltage changes by
ΔVo = ( Ibias ∙ R/4) ∙ ΔR/( R+ΔR/4 )
For our R = 1000 Ω, ΔR = ±100 Ω and I bias = 10 mA, we can expect a ΔVo of
ΔVo = ( 0.01 ∙ 1000/4) ∙ ±100/(1000 + ±100/4)
= +243.9 mV, -256.4 mV
CIRCUIT INSIGHT Simulate the SPICE circuit SBRIDGE_I_BIAS1.CIR. Does the output voltage swing as expected? Check Vo by adding trace V(15,16). You can get a better measure of Vo by using the cursor function in PSPICE.
HANDS-ON DESIGN What about the total voltage across the bridge? In other words, how much voltage are we asking of the op amp's output V(4)? Add trace V(4). If this voltage is beyond your supply rails, you need to make some design changes. The voltage at V(4) can be approximated by
Vtot = Ibias ∙ (RS1 + R + RS2 + RSENSE)
or
Vtot = Ibias ∙ (RS1 + R + RS2) + VREF
If your system had a +5V supply rail, the present system would not
function! How much would you
have to reduce Ibias to bring V(4) under the rail? Reduce VREF or increase
RSENSE, then rerun the SPICE file. Will your circuit now run with a +5V
supply? Don't forget to recheck your output
at
V(15,16). What happened to
the output swing? Of course, reducing Ibias will also reduce
ΔVo!
Yes, your circuit will now work, But you had to sacrifice some signal. You could always make it up with a gain amplifier. But any noise picked up on the long wires will be amplified right along with the signal. Trade-offs and compromises always seem waiting around the corner.
CIRCUIT INSIGHT
What happens if you have an extra long 4-wire cable running to your
bridge? Increase RS1and RS4 from 1 to 25 Ω, rerun the
simulation and check the output V(15,16). Same output swing! The op amp
compensates for the additional series resistance adjusting V(4) higher to
maintain the same current. Try increasing RS2 and RS3. These resistors
should have no effect on ΔVo either. Why? Typically, Vo feeds an amplifier
having high input impedance (> 100 MΩ). The result is little current flowing
through RS2 and RS3. Little current means little voltage drop to degrade the
bridge output.
CURRENT SERVO ACCURACY
Let's check the accuracy of the op amp current servo. We asked for 10 mA, what did we really get? With RSENSE = 100 and VREF = 1.0, run a simulation and plot I(RSENSE). Not bad - the current is within μA of 10 mA - a small error! But why is there any error at all? For any control system, the circuit's gain has a direct effect on accuracy. For this circuit, the internal gain of the op amp drives accuracy.
HANDS-ON DESIGN Decrease the internal gain of the op amp. How? First, find the EPI statement inside the op amp subcircuit named OPAMP1. Now decrease the gain of 100000 (representing 100000 V/V) to a value like 100. Rerun the simulation and check I(RSENSE). Woops, what happened to the accuracy of the current? The error has grown! Okay now let's get an op amp with big gain like 1000000. Much better, less than one μA of error.
Additional Op Amp Errors - There's additional errors at the op amp's input not simulated here, like bias currents Ib and an offset voltage Voff. The Ib term partially flows into RSENSE creating a current error. Similarly, Voff directly adds to the VREF voltage, creating a error on the reference voltage.
PUBLIC ENEMY - HEAT
Suppose you had to deliver a large bridge current and we're trying to squeeze a lot of accuracy out of the circuit. You may find yourself wrestling with heat! What's the problem? The op amp may be heating up. Passing 10 mA and dropping 5V across the op amp may not seem like much, but in a tiny SMT package, the temperature of the op amp's die could start to rise. And temperature changes can cause op amp characteristics like internal gain, bias current Ib and offset voltage Voff to drift. This could spell trouble for your current servo's accuracy.
What's the solution? Get the heat get out of the op amp by placing a current buffer at the op amp's output. Sure the transistor may heat and its errors drift, but the component regulating the current - the op amp - stays nice and cool! It need only supply the transistor's base with small amounts of current to regulate the larger bridge current, Ibias. However, one drawback is the voltage across RE1. This voltage takes away from the available supply voltage to drive the bridge.
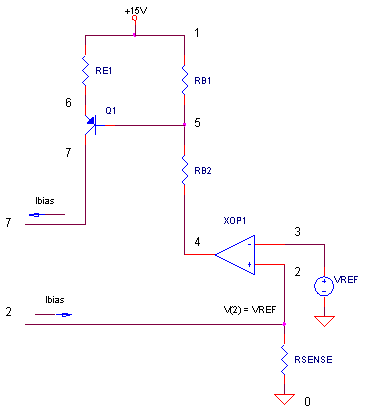
NOTICE! The op amp's positive and negative inputs need to be reversed! Why? Because the current buffer is an inverter, the op amp's input must also be inverted for proper operation of the control loop. Copy the SPICE file to a new file and add these components.
* CURRENT BUFFER
RB1 1 5 1.7K
RB2 5 4 10K
Q1 7 5 6 QNOM
RE1 1 6 100
.model QNOM PNP(BF=100)
This circuit could be tricky to implement. Don't forget to connect the sensor bridge at RS1 to node 7 instead of node 4.
SIMULATION NOTES
For a quick review of subcircuits, check out
Why Use Subcircuits?
For a description of all op amp models, see
Op Amp Models.
Learn about op amp errors: Input Offset Voltage and
Input Bias Current.
Check out the circuits available from the
Circuit Collection page.
SPICE FILE
Download the file or copy this netlist into a text file with the *.cir extension.
BRIDGE_I_BIAS1.CIR - CURRENT DRIVEN BRIDGE
*
* SENSOR BRIDGE
RS1	4	11	1
R1	11	12	1K
XR2	12 14	20 0	VCR
R3	11	13	1K
R4	13	14	1K
RS4	14	2	1
*
* MEASUREMENT WIRES AND RIN OF AMP
RS2	12	15	1
RAMP	15	16	100MEG
RS3	13	16	1
*
* OPAMP CURRENT SERVO
VREF	3	0	DC 1V
RSENSE	2	0	100
XOP1	3 2	4	OPAMP1
*
*
* VOLTAGE CONTROL FOR VCR - INCREASING RESISTANCE CHANGE
VC1	20 	0	PWL(0MS 0.9  10MS 1.1)
RD1	20 	0	1G
*
*
* SUBCIRCUIT FOR VOLTAGE CONTROLLED RESISTOR (VCR)
*	RESISTOR - 1,2     CONTROL - 4,5
.SUBCKT VCR   1  2  4  5
ERES	1 3	 VALUE = { I(VSENSE)*1K*V(4,5) }
VSENSE	3	2	DC	0
.ENDS
*
* SINGLE-POLE OPERATIONAL AMPLIFIER MACRO-MODEL
* connections:       non-inverting input
*                    |   inverting input
*                    |   |   output
*                    |   |   |
.SUBCKT OPAMP1       1   2   6
* INPUT IMPEDANCE
RIN	1	2	10MEG
* DC GAIN (100K) AND POLE 1 (100HZ)
EP1	3 0	1 2	100000
RP1	3	4	1K
CP1	4	0	1.5915UF
* OUTPUT BUFFER AND RESISTANCE
EOUT	5 0	4 0	1
ROUT	5	6	10
.ENDS
*
*
* ANALYSIS
.TRAN 	0.1MS  10MS
*
* VIEW RESULTS
.PLOT	TRAN	V(15,16)
.PROBE
.END
© 2005 eCircuit Center