Op Amp PID Controller
CIRCUIT
OP_PID1.CIR Download the SPICE file
We've all heard about the wonders of the PID controller, bringing a system's output - temperature, velocity, light - to its desired set point quickly and accurately. But now, your project manager says okay, design one for us. Although there's a number of ways to do it, the circuit above nicely separates the three terms into three individual op amp circuits.
We'll build it in SPICE, test each term and finally place it inside a motor speed controller for you to tune. If you wish, take a quick review of PID Control.
THE PID CONTROLLER
What basic components are needed for a servo system? Many look similar to the circuit below. The error amp gives you a constant reality check. How? It compares where you want to go, Vset, with where you're at now, Vsensor, by calculating the difference between the two, Verr = Vset - Vsensor. The PID controller takes this error and determines the drive voltage applied to the process in an attempt to bring Vset = Vsensor or Verr = 0.
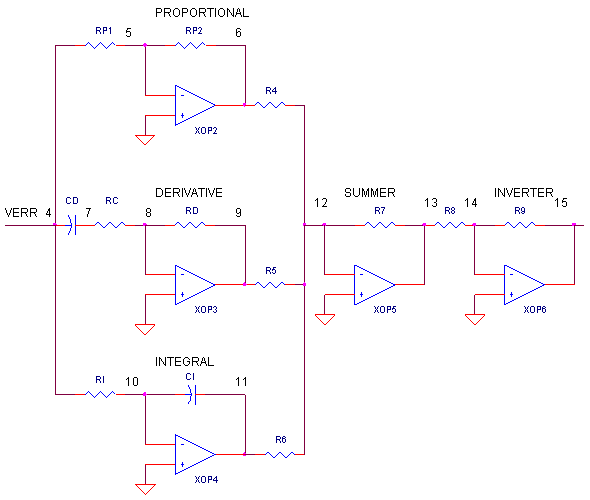
ERROR AMPLIFIER. A classic circuit for calculating the error is a summing op amp. In the controller, XOP1 performs the error calculation. Remembering that the summing amp is an inverting amp, we calculate its output using R1 = R2 = R3 = 10 k.
Verr = - (Vset/R1 + Vsensor/R2)∙R3
= (Vset + Vsensor) ∙ (10k/10k)
= - ( Vset + Vsensor )But how does the summer calculate a difference? Well, it does require that your sensor circuit produce a negative output voltage. Assuming that Vsensor is the negative of the actual sensor voltage Vsensor = - Vsens, you get the difference.
Verr = -( Vset - Vsens )
You can look at the error amp's function this way. When Vsensor is exactly the negative of Vset, the currents through R1 and R2, equal and opposite, cancel each other as they enter the op amps's summing junction. You end up with zero current through R3 and of course 0V, or zero error, at the output. Any difference between Vset and -Vsensor, results in an error voltage at the output that the PID controller can act upon.
OP AMP PID CONTROLLER. How do we get the PID terms from the error voltage Verr? We enlist three simple op amp circuits. If you need, take a review of the op amp amplifier, integrator and differentiator circuits.
Term Op Amp Circuit Function P Amplifier:
Vo = (RP2 / RP1) ∙ VerrI Integrator:
Vo = 1/(RI∙CI)∙∫ Verr dtD Differentiator:
Vo = RD∙CD ∙ dVerr/dtLastly, we need to add the three PID terms together. Again the summing amplifier XOP5 serves us well. Because the error amp, PID and summing circuits are inverting types, we need to add a final op amp inverter XOP6 to make the final output positive, given a positive Vset.
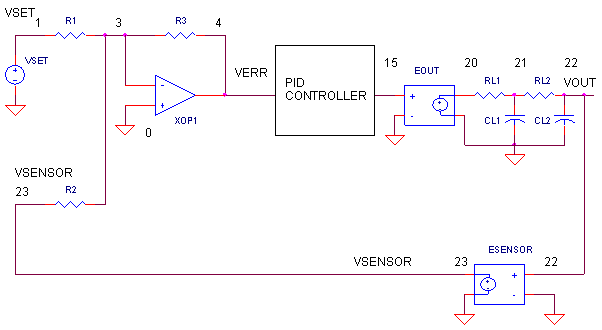
OUTPUT PROCESS. EOUT represents a very simplified model of a process to be controlled, such as motor velocity for example. The gain of 100 could represent an output transfer function of 100 RPM / V. To include the effects of the motor's inertia, we've added some time delay into the output using two cascaded RC filters. Although Vout is simulated in volts, we know it really represents RPM.
SENSOR. The sensor tells you the actual velocity at the motor, 1 V / 100 RPM for this tachometer. ESENSOR models this feedback device. Note, this sensor block actually produces a negative output voltage, the proper input polarity for your error amplifier as mentioned above.
PRE-FLIGHT TEST
Before we close the loop, how do we test our PID terms? Let's apply a signal to the controller and check each term individually. VSET applies a 0.1V step to the error amplifier. Because R2 is initially connected to ground (node 0), the servo loop is essentially opened and the 0.1V step gets applied directly to the PID inputs.
P TEST
Run a simulation of the circuit file OP_PID.CIR. Plot the
input V(1) and the P Term
at V(6). What voltage should we expect here? With RP2 = 2k and RP1 =
1k, you should see a step of
V(6) = V(3)∙ RP2 / RP1
= 0.1 ∙ 2k / 1k
= 0.2 V
D TEST How much voltage should the derivative term produce? With CD = 0.1 uF, RD = 1k and a voltage rise of 0.1 V in 0.1 ms, the circuit should reach a peak of
V(9) = CD ∙ RD ∙ ΔV/Δt
= 0.1 uF ∙ 1k ∙ 0.1 V / 0.1 ms
= 100 mV
during the rise time of the step voltage.
I TEST Finally, let's check the integral term. With RI = 100MΩ, CI = 1uF, V(3) = 0.1 V and a test time of Δt = 10 ms, the integrator should create a ramp that rises to
V(11) = V(3) / (RI ∙ CI) ∙ Δt
= 0.1 V / (100M ∙ 1 uF) ∙ 10 ms
= 10 μV
at 10 ms. Now that we've developed some confidence in our op amp-based controller, let's take the plunge and close the loop.
TUNING THE PID CONTROLLER
Okay, time to pilot the PID controls. What kind of response are we looking for? Typically, one that's quick and accurate. The initial circuit component values make for a weak P and almost negligible I and D terms. To close the loop, connect R2 to the sensor (node 23) by changing R2 0 3 10k to
R2 23 3 10k
Although there are many PID tuning methods under the sun, here's a straightforward one to test our controller.
1. SET KP. Starting with KP = 5, KI = 0 and KD = 0. Incrementally increase KP to reduce error until the output starts overshooting and ringing significantly.
2. SET KD. Increase KD to reduce the overshoot to an acceptable level.
3. SET KI. Increase KI to bring the final error to zero.
Extend the simulation time to 100 ms in the .TRAN statement and run a new SPICE simulation. Plot the system input V(1) and the sensor output (23). With Vset = 0.1 V, what should we expect at the sensor output? An ideal controller will bring Vsensor = - 0.1V, equal and opposite of Vset, implying 0 error at V(3). If you wish, you can keep an eye on the PID terms by plotting V(6), V(9) and V(11) in another window.
SET KP Although the response at V(23) looks smooth, the sensor voltage falls short of -0.1 V. So let's crank up KP. You can do this by either decreasing RP1 or increasing RP2. Let's increase RP2 to 5k Hey, things are improving!
But instability stirs just beneath the surface in the form of some overshoot and ringing. Push RP2 up to 10k, 50k, or more. Yes, you get closer to -0.1 V, but overshoot gets worse. Eventually, your system will become unstable and begin to sing (oscillate). You can back off RP2 to 50k or so.
SET KD The derivative term counteracts KP to tame the overshoot and ringing. Start increasing RD from 1k to 10k, 100k and so on. You should see stability returning in the form of a smoother response at V(23). But too much KD, and you're back to instability.
SET KI With RP2 = 50k; and RD = 100k, let's kick up the I term to reel in the last bit of error. To do this, you can decrease RI or CI. Start decreasing RI from 100 M, 10 M and so on. At some point you should see the sensor's output start walking closer toward -0.1 V. You might want to put up a cursor to monitor the exact value of V(23). The bigger you make KI, the faster it will move toward -0.1 V. But like the other terms, there's usually a sweet spot that gives you the a reasonable response.
Congratulations, you've earned your junior wings as an op amp PID tuner! Of course, you'll need plenty of hours on a real system before you can say it boldly, but this is a good start.
PID ADJUSTMENTS
In a real circuit, adjusting the PID gains by swapping resistors and capacitors may be cumbersome. Potentiometers make a better choice. But you still may have to swap Rs and Cs to get you in the ballpark. Once there, you have a few options. I've seen one circuit where three pots were hung from node 3 to ground. At the centertaps of each, components RP1, CD and RI were connected. Another incarnation hung three pots, one at the output of each term - nodes 6, 9 and 11 - with their centertaps connected to summer components R4, R5 and R6. Let me know if you come across other useful adjustment methods.
SIMULATION NOTE
To make the PID controller more realistic, a voltage clamp was added to the op amp model. Tacking zener diodes onto the model simulates the output hitting a ±10 V maximum. Why add this feature? Without the clamp, the simulated PID terms may generate hundreds of volts in an attempt to control the output. This may lead to disappointing results when the actual PID outputs get stuck near the supply rails. You can see if any PID terms hit the rail by plotting V(6), V(9) and V(11). What would happen at different clamp levels or without any clamping? You can change the clamp level via the BV parameter in the DZ model or comment out the clamp diodes all together.
THE DERIVATIVE TERM
Of the PID functions, the derivative can be one of the trickier terms. Why? This circuit brings two challenges to the table.
1) Because the circuit is a high-pass filter by nature, it may amplify unwanted noise and disturbances causing an erratic drive signal. To reduce this undesirable effect, resistor RC places a limit on the high frequency gain to Gmax = RD / RC. To further cut the high frequency gain, many circuits include a feedback cap CF across RD. With CF, the circuit begins to look like a low-pass filter at higher frequencies. For a good starting point, pick CF = CD / 10.
2) The second challenge is keeping the derivative circuit stable. The classic Op Amp Differentiator may ring or oscillate if not for resistor RC. This resistor reduces the phase-shift caused by RD and CD especially at high frequencies where it can threaten circuit stability. Capacitor CF brings an added bonus of bringing stability to the differentiator. And to boot, CF helps the differentiator recover in case its output is overdriven to the supply rails.
SPICE FILE
Download the file or copy this netlist into a text file with the *.cir extention.
OP_PID1.CIR - OPAMP PID CONTROLLER
*
* SET POINT
VSET 1 0 PWL(0MS 0MV  0.1MS 0.1V 2000MS 0.1V)
*
* CALCULATE ERROR
R1	1	3	10K
R2	0	3	10K
R3	3	4	10K
XOP1	0 3 4	OPAMP1
*
* P - PROPORTIONAL TERM
RP1	4	5	1K
RP2	5	6	2K
XOP2	0 5 6	OPAMP1
*
* D - DERIVATIVE TERM
CD	4	7	0.1UF
RC	7	8	200
RD	8	9	1K
XOP3	0 8 9	OPAMP1
*
* I - INTEGRAL TERM
RI	4	10	100MEG
CI	10	11	1UF IC=0
XOP4	0 10 11	OPAMP1
*
* SIM PID TERMS
R4	6	12	10K
R5	9	12	10K
R6	11	12	10K
R7	12	13	10K
XOP5	0 12 13	OPAMP1
*
* INVERT SUMMATION
R8	13	14	10K
R9	14	15	10K
XOP6	0 14 15	OPAMP1
*
* PROCESS BLOCK WITH TIME LAG (PHASE SHIFT)
EOUT	20 0	15 0	100
RL1	20	21	10K
CL1	21	0	1UF
RL2	21	22	10K
CL2	22	0	1UF
*
* SENSOR BLOCK (NEG OUT FOR ERROR AMP.)
ESENSOR	23 0	22 0	-0.01
RL3	23	0	10K
*
* OPAMP MACRO MODEL, SINGLE-POLE WITH 10V OUTPUT CLAMP
* connections:      non-inverting input
*                   |   inverting input
*                   |   |   output
*                   |   |   |
.SUBCKT OPAMP1	    1   2   6
* INPUT IMPEDANCE
RIN	1	2	10MEG
* DC GAIN=100K AND POLE1=100HZ
* UNITY GAIN = DCGAIN X POLE1 = 10MHZ
EGAIN	3 0	1 2	100K
RP1	3	4	100K
CP1	4	0	0.0159UF
* ZENER LIMITER
D1	4	7	DZ
D2	0	7	DZ
* OUTPUT BUFFER AND RESISTANCE
EBUFFER	5 0	4 0	1
ROUT	5	6	10
*
.model	DZ	D(Is=0.05u Rs=0.1 Bv=10 Ibv=0.05u)
.ENDS
*
* ANALYSIS
.TRAN 	0.1MS 10MS
*
* VIEW RESULTS
.PROBE
.END
© 2004-2023 eCircuit Center